Creating a login form is a fundamental requirement for many web applications that aim to secure user access. With a login system, only verified users can access specific pages or features. In this tutorial, we will use aaPanel as the server control panel to simplify database and file management.
A login form is an essential element that not only helps restrict access but also ensures the security of both user data and the system. The use of aaPanel in this tutorial is intended to make server and database management easier, allowing the development process to be more efficient and structured.
Creating the Database and Users Table
The first step is to add a website and set up a database in aaPanel. Log in to aaPanel, open the Website menu, and click Add Site.
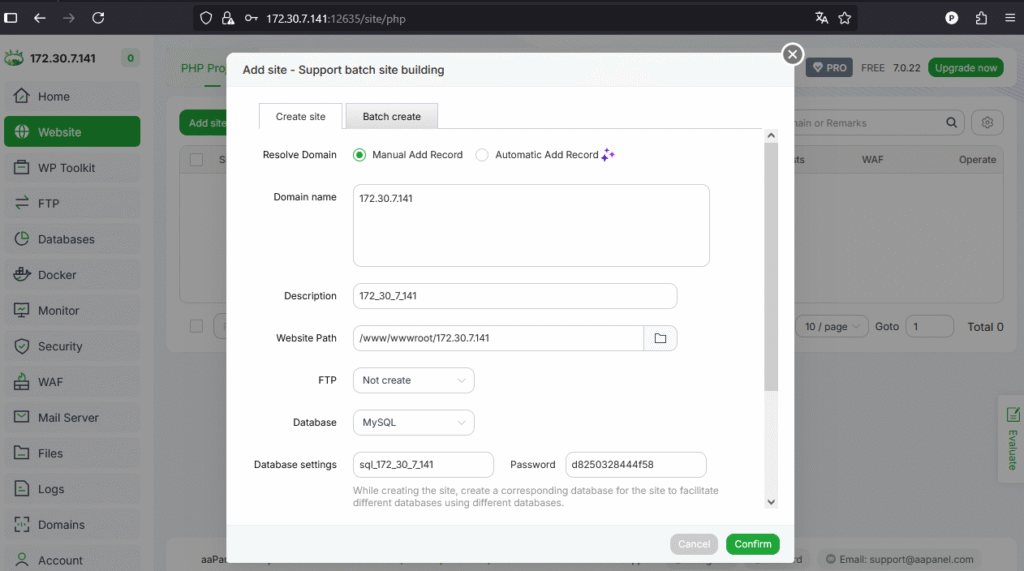
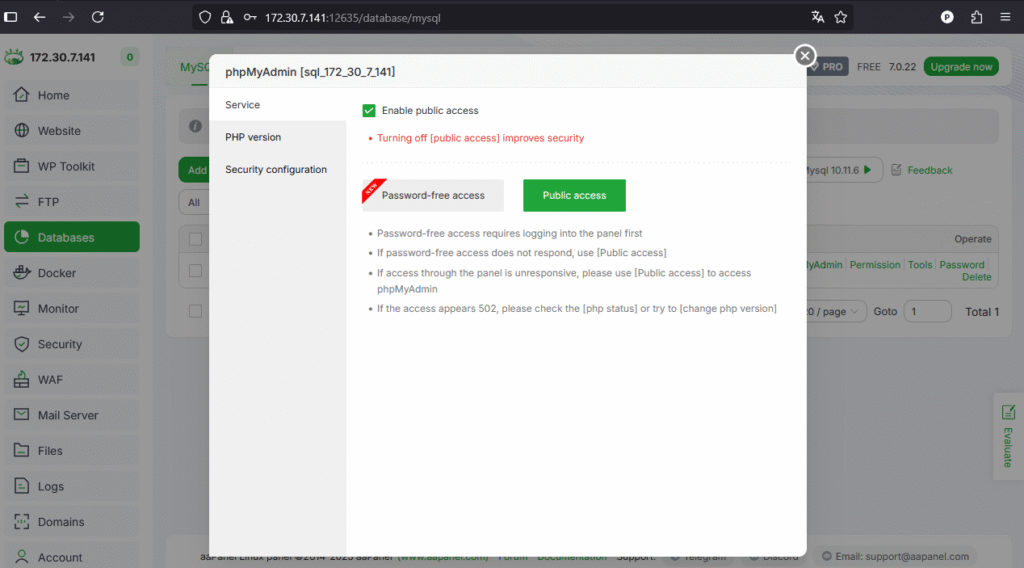
Enter the domain or IP address to access the login form website. In the Database section, select MySQL. This will automatically generate the database username and password. To access phpMyAdmin, go to the Databases menu, find the database you just created, then click phpMyAdmin > Public Access.
Next, log in to phpMyAdmin, go to the SQL tab, and enter the following command:
CREATE TABLE users (
  id INT(11) UNSIGNED AUTO_INCREMENT PRIMARY KEY,
  username VARCHAR(50) NOT NULL,
  email VARCHAR(100) NOT NULL UNIQUE,
  password VARCHAR(255) NOT NULL
);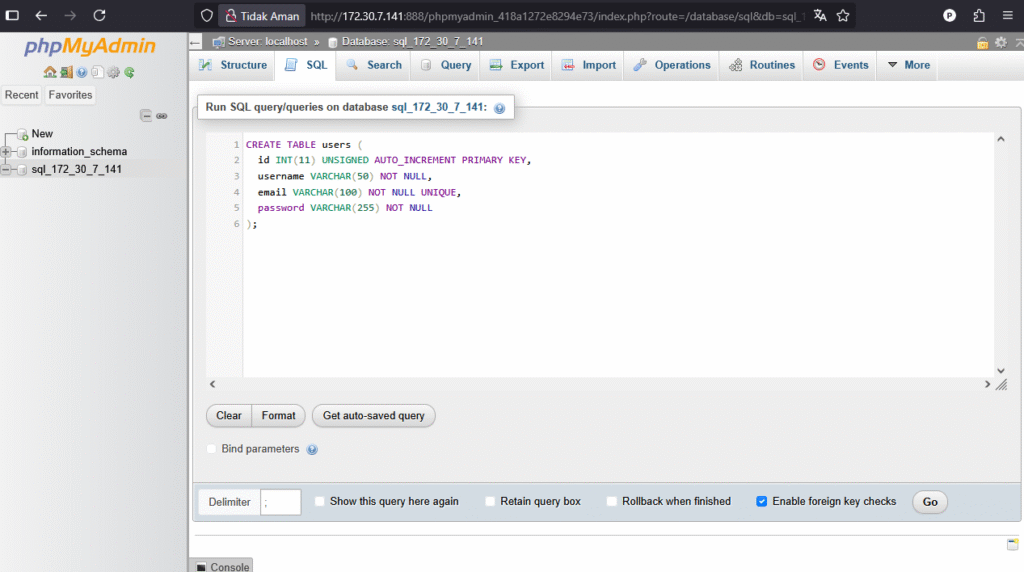
Perintah ini akan membuat tabel dengan kolom id, username, email, dan password. Password disimpan dalam bentuk hash menggunakan fungsi password_hash() PHP yang secara otomatis mengamankan password dengan salt dan algoritma hashing yang kuat untuk menjaga keamanan data.
Menyiapkan Koneksi PHP ke Database MySQL
This command will create a table with columns for id, username, email, and password. The password is stored as a hash using PHP’s password_hash() function, which automatically secures it with a strong hashing algorithm and salt for maximum data protection.
Setting Up PHP Connection to MySQL Database
Next, create a config.php file to connect the PHP application to the database.
Open the Files menu in aaPanel and create the config.php file in your project folder, then fill it with the following code:
<?php
$host = "localhost";
$user = "sql_172_30_7_141";
$password = "d8250328444f58";
$database = "sql_172_30_7_141";

$conn = new mysqli($host, $user, $password, $database);

if ($conn->connect_error) {
    die("Koneksi gagal: " . $conn->connect_error);
}
?>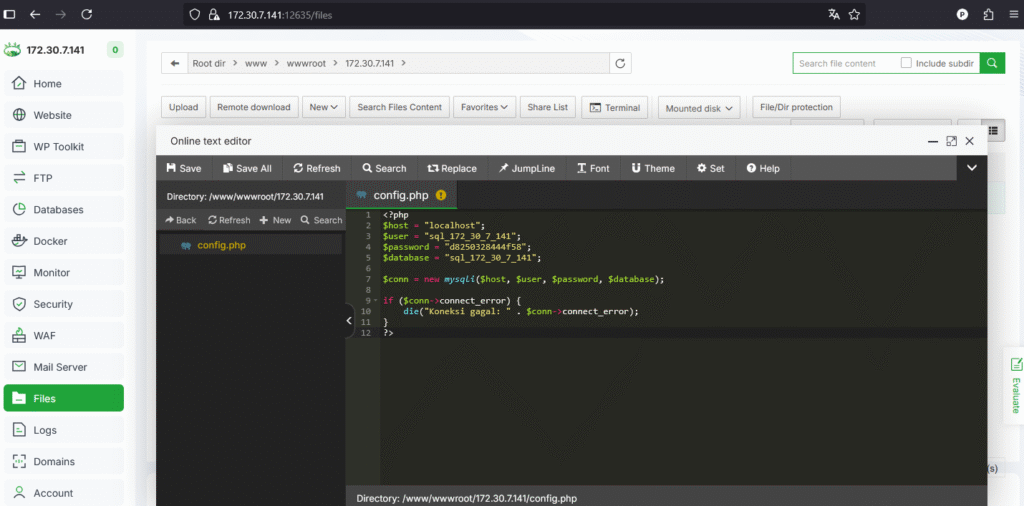
Replace the values for $user, $password, and $database with your actual database credentials. This file is crucial because all database operations will rely on this connection.
Creating the Login Form for User Validation
Create an index.php file for the login form. This file will display the login form and check the user’s credentials in the database.
<?php
session_start();
require 'config.php';
$success_msg = '';
if (isset($_GET['registered']) && $_GET['registered'] == 'true') {
$success_msg = "Pendaftaran berhasil! Silakan login dengan akun Anda.";
}
if (isset($_POST['login'])) {
$email = $_POST['email'];
$password = $_POST['password'];
$stmt = $conn->prepare("SELECT id, username, password FROM users WHERE email = ?");
$stmt->bind_param("s", $email);
$stmt->execute();
$result = $stmt->get_result();
if ($result->num_rows === 1) {
$user = $result->fetch_assoc();
if (password_verify($password, $user['password'])) {
$_SESSION['user_id'] = $user['id'];
$_SESSION['username'] = $user['username'];
header("Location: berhasil-login.php");
exit;
} else {
$error = "Email atau password salah.";
}
} else {
$error = "Email atau password salah.";
}
}
?>
<!DOCTYPE html>
<html lang="id">
<head>
<meta charset="UTF-8" />
<title>Login</title>
<link rel="stylesheet" href="style.css" />
</head>
<body>
<div class="login-form">
<h2>Login</h2>
<?php
if ($success_msg) {
echo "<p class='success'>$success_msg</p>";
}
if (isset($error)) {
echo "<p class='error'>$error</p>";
}
?>
<form method="post" action="">
<input type="email" name="email" placeholder="Email" required />
<div class="password-wrapper">
<input type="password" id="password" name="password" placeholder="Password" required />
<span class="toggle-password" onclick="togglePassword('password')">👁</span>
</div>
<button type="submit" name="login">Masuk</button>
</form>
<p>Belum punya akun? <a href="register.php">Daftar di sini</a></p>
</div>
<script>
function togglePassword(id) {
const passInput = document.getElementById(id);
const icon = event.currentTarget;
if (passInput.type === "password") {
passInput.type = "text";
icon.style.color = '#1e90ff';
} else {
passInput.type = "password";
icon.style.color = '#888';
}
}
</script>
</body>
</html>To make the login form look attractive and responsive, create a style.css file with the following code:
@import url('https://fonts.googleapis.com/css2?family=Poppins&display=swap');
body {
font-family: 'Poppins', sans-serif;
background: #f0f2f5;
display: flex;
justify-content: center;
align-items: center;
height: 100vh;
margin: 0;
}
.login-form {
background: white;
padding: 30px;
border-radius: 8px;
box-shadow: 0 4px 20px rgba(0,0,0,0.1);
width: 350px;
transition: box-shadow 0.3s ease;
}
.login-form:hover {
box-shadow: 0 6px 30px rgba(0,0,0,0.15);
}
.login-form h2 {
margin-bottom: 20px;
text-align: center;
color: #222;
font-weight: 600;
}
.login-form input {
width: 100%;
padding: 12px 15px;
margin: 10px 0;
border: 1.8px solid #ccc;
border-radius: 6px;
box-sizing: border-box;
font-size: 14px;
transition: border-color 0.3s ease;
}
.login-form input:focus {
border-color: #1e90ff;
outline: none;
}
/* styling untuk wrapper password dan icon toggle */
.password-wrapper {
position: relative;
}
.password-wrapper input[type="password"],
.password-wrapper input[type="text"] {
width: 100%;
padding-right: 40px;
}
.toggle-password {
position: absolute;
top: 50%;
right: 12px;
transform: translateY(-50%);
cursor: pointer;
user-select: none;
font-size: 18px;
color: #888;
transition: color 0.3s ease;
}
.toggle-password:hover {
color: #1e90ff;
}
.login-form button {
width: 100%;
padding: 14px;
background: #1e90ff;
color: white;
border: none;
border-radius: 6px;
cursor: pointer;
font-size: 16px;
font-weight: 600;
transition: background-color 0.3s ease;
}
.login-form button:hover {
background: #0c7cd5;
}
.login-form p {
text-align: center;
margin-top: 15px;
color: #555;
font-size: 14px;
}
.login-form a {
color: #1e90ff;
text-decoration: none;
font-weight: 500;
}
.login-form a:hover {
text-decoration: underline;
}
.error {
background: #ffdddd;
color: #d8000c;
padding: 10px;
margin-bottom: 15px;
border-radius: 6px;
text-align: center;
font-size: 14px;
}
.success {
background: #d4edda;
color: #155724;
padding: 10px;
margin-bottom: 15px;
border-radius: 6px;
text-align: center;
font-size: 14px;
border: 1.5px solid #c3e6cb;
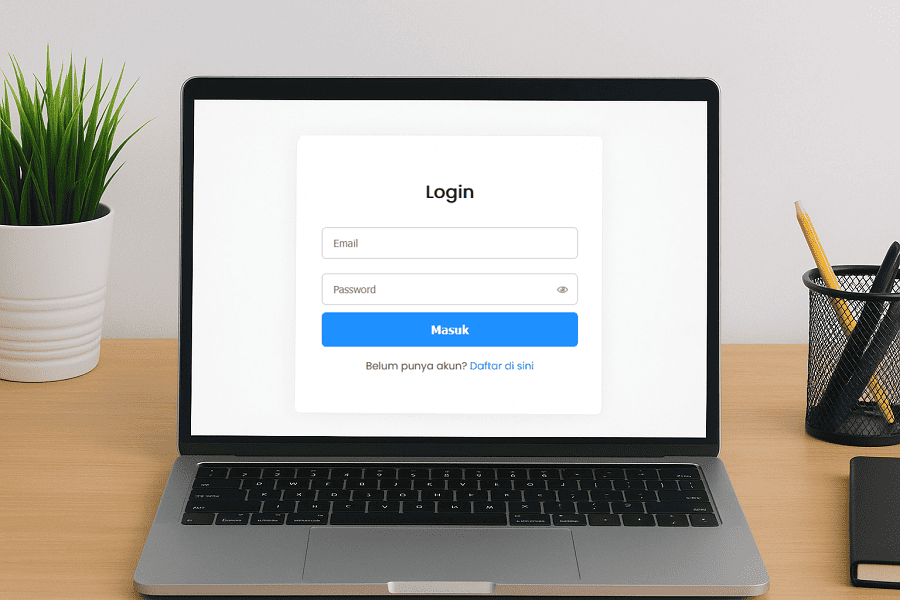
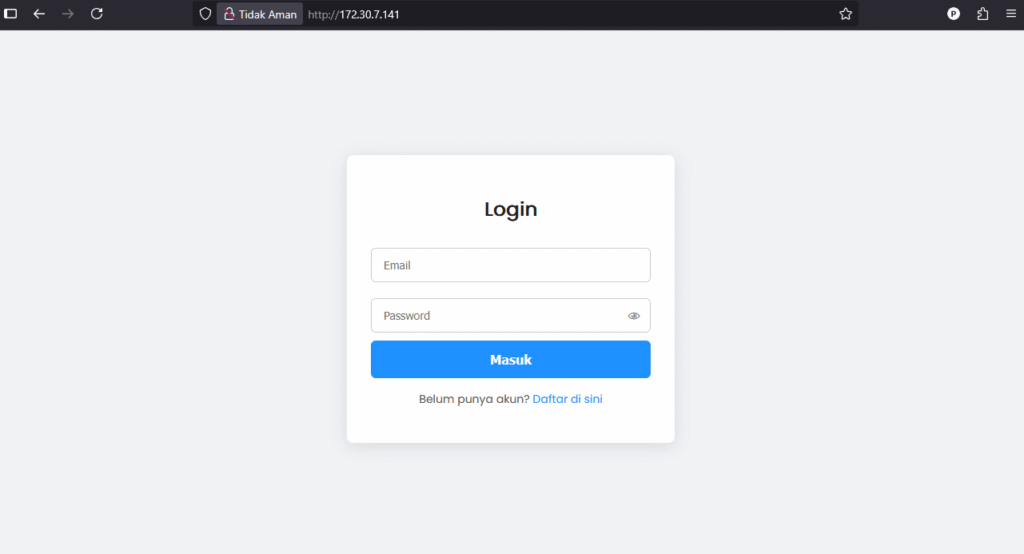
}The CSS code above uses the Poppins font and gives the login page a modern, user-friendly look. Here’s what the styled login form will look like:
Creating the Registration Form for New Users
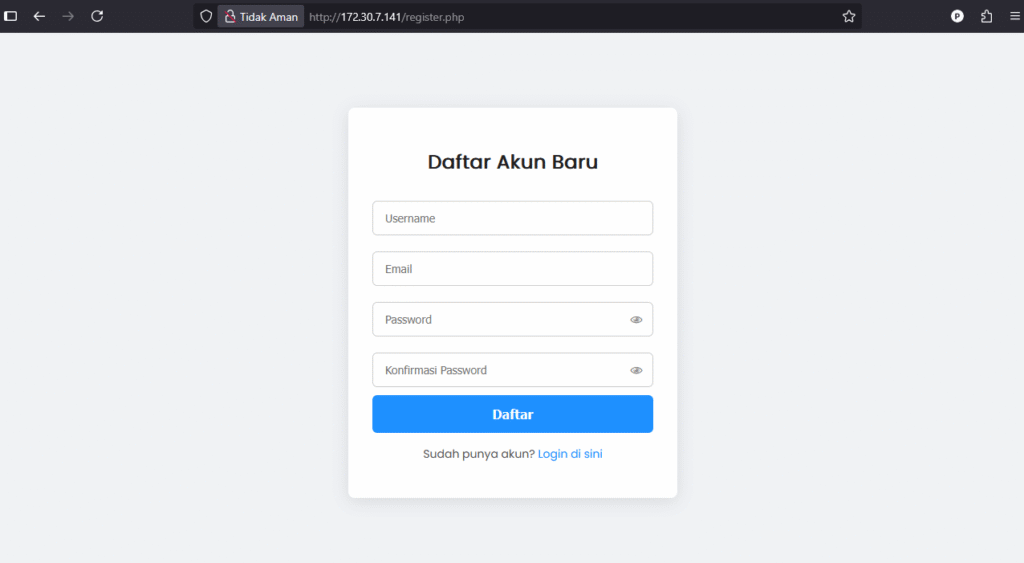
Create a register.php file for the account registration form.
<?php
require ‘config.php’;
if (isset($_POST[‘register’])) {
$username = $_POST[‘username’];
$email = $_POST[’email’];
$password = $_POST[‘password’];
$confirm_password = $_POST[‘confirm_password’];
if ($password !== $confirm_password) {
$error = “Password dan konfirmasi password tidak sama.”;
} else {
$stmt = $conn->prepare(“SELECT id FROM users WHERE email = ?”);
$stmt->bind_param(“s”, $email);
$stmt->execute();
$stmt->store_result();
if ($stmt->num_rows > 0) {
$error = “Email sudah terdaftar.”;
} else {
$hashed_password = password_hash($password, PASSWORD_DEFAULT);
$stmt = $conn->prepare(“INSERT INTO users (username, email, password) VALUES (?, ?, ?)”);
$stmt->bind_param(“sss”, $username, $email, $hashed_password);
if ($stmt->execute()) {
header(“Location: index.php?registered=true”);
exit;
} else {
$error = “Terjadi kesalahan saat mendaftar.”;
}
}
}
}
?>
<!DOCTYPE html>
<html lang=”id”>
<head>
<meta charset=”UTF-8″ />
<title>Registrasi</title>
<link rel=”stylesheet” href=”style.css” />
</head>
<body>
<div class=”login-form”>
<h2>Daftar Akun Baru</h2>
<?php if (isset($error)) echo “<p class=’error’>$error</p>”; ?>
<form method=”post” action=””>
<input type=”text” name=”username” placeholder=”Username” required />
<input type=”email” name=”email” placeholder=”Email” required />
<div class=”password-wrapper”>
<input type=”password” id=”password” name=”password” placeholder=”Password” required />
<span class=”toggle-password” onclick=”togglePassword(‘password’)”>👁</span>
</div>
<div class=”password-wrapper”>
<input type=”password” id=”confirm_password” name=”confirm_password” placeholder=”Konfirmasi Password” required />
<span class=”toggle-password” onclick=”togglePassword(‘confirm_password’)”>👁</span>
</div>
<button type=”submit” name=”register”>Daftar</button>
</form>
<p>Sudah punya akun? <a href=”index.php”>Login di sini</a></p>
</div>
<script>
function togglePassword(id) {
const passInput = document.getElementById(id);
const icon = event.currentTarget;
if (passInput.type === “password”) {
passInput.type = “text”;
icon.style.color = ‘#1e90ff’;
} else {
passInput.type = “password”;
icon.style.color = ‘#888’;
}
}
</script>
</body>
</html>
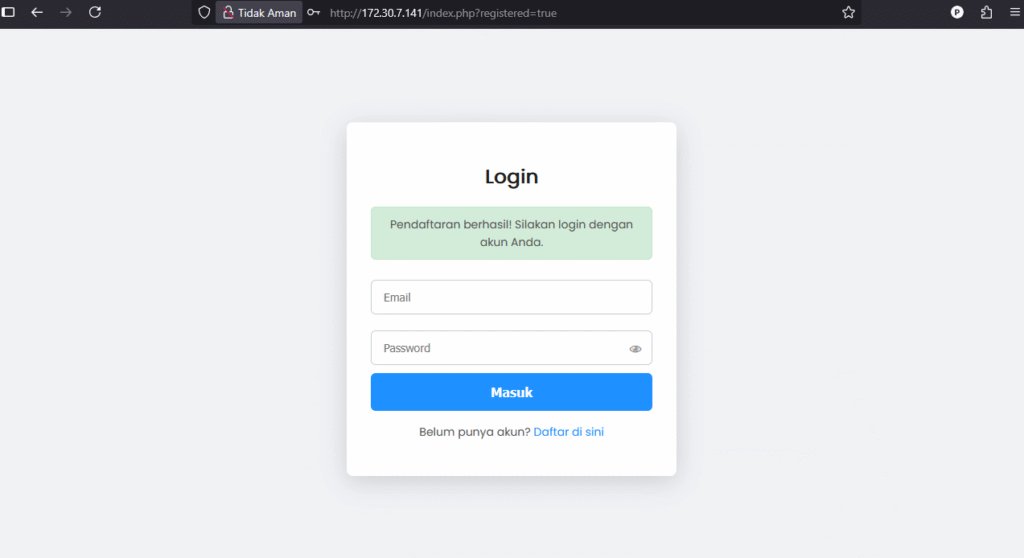
This page allows new users to create an account by saving their details in the database with an encrypted password. Here’s what it looks like after successfully creating an account:
Displaying the Welcome Page After Login
Create a berhasil-login.php file to display a welcome message and a logout button.
<?php
session_start();

if (!isset($_SESSION['user_id'])) {
    header("Location: index.php");
    exit;
}
?>

<!DOCTYPE html>
<html lang="id">
<head>
    <meta charset="UTF-8" />
    <title>Selamat Datang</title>
    <link rel="stylesheet" href="style.css" />
</head>
<body>
<div class="login-form">
    <h2>Selamat Datang, <?php echo htmlspecialchars($_SESSION['username']); ?>!</h2>
    <p>Anda berhasil login.</p>
    <a href="logout.php"><button>Logout</button></a>
</div>
</body>
</html>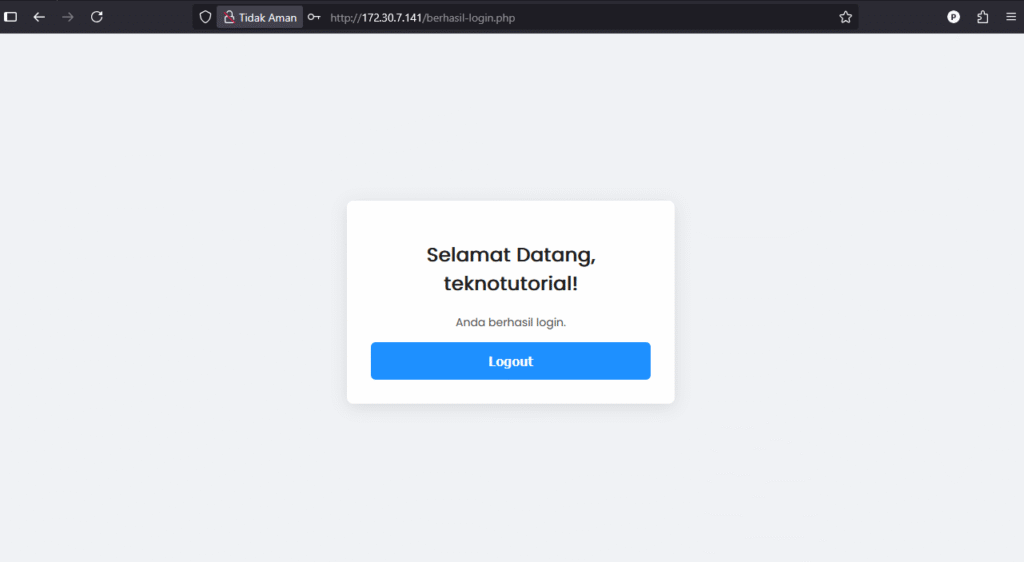
This page can only be accessed by logged-in users, ensuring security and privacy.
Creating the Logout Function
Finally, create a logout.php file to end the session and redirect the user back to the login page.
<?php
session_start();
session_unset();
session_destroy();
header("Location: index.php");
exit;
?>
When logging out, all session data will be deleted so that access to restricted pages will be denied until the user logs in again.
Conclusion
This tutorial has provided a complete guide on how to create a login and registration form using PHP and MySQL while managing the server with aaPanel. The login and registration system uses PHP’s password_hash() function for password security, ensuring that user data remains protected.
Understanding sessions, data validation, and database management is essential when building secure and reliable web applications. By following this tutorial, you have laid a solid foundation for developing web-based applications with effective authentication features.
